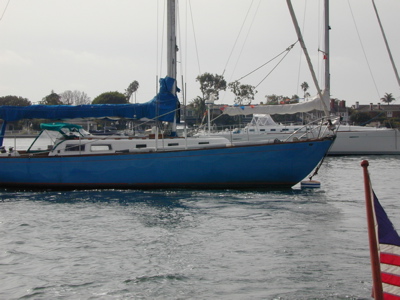
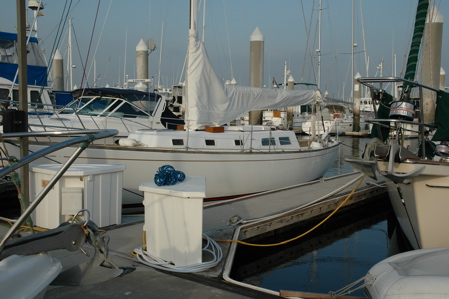
The first look at the boat showed what we getting ourselves in for. The owners were an elderly couple who had owned it for 12 or 13 years. They had done extensive cruising but were now too old (87) to take it off the mooring. I don’t think it had been off the mooring in several years. The husband hated to sell but said his wife refused to go on the boat with him anymore. We bought it on the spot. I promised him we would take him sailing once we had restored it. I had no idea how long that would take. Fortunately, he is still with us and we took the two of them to see it a couple of months ago. We bought the boat in November 2004, took it to a yard where it stayed seven months, then it was finally finished about May of 2007.
The blue hull paint was in poor condition. The engine ran but leaked oil. The mast paint was flaking off, the winches were frozen. Most of the gear was inoperable.
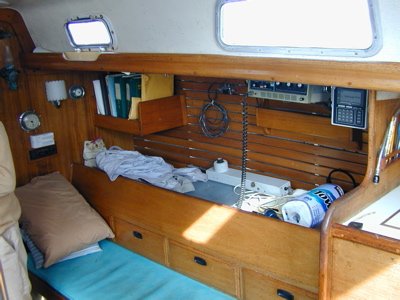
The interior was in fair condition except for old, mildewed cushions that would have to be replaced. The engine box, a heavy awkward thing at best, had been cut and modified to fit an engine that was too big for the space. It would have to go. There was a lightweight racing ladder that was tubular steel with teak treads. With a small modification, that is our ladder today. The wiring was old and the panel needed replacing. I had a new lightweight engine box built.
The engine controls were old and were on the wrong side for the new engine we ordered. That would have to be switched. Also, I like the Morse sailboat controls, which allow the two handles to be removed when sailing. Unfortunately, Morse desn’t make them anymore but I found a set in Minney’s Chandlery.
The cabin was filled with obsolete electronics, like the old VHF radio above the pilot berth.
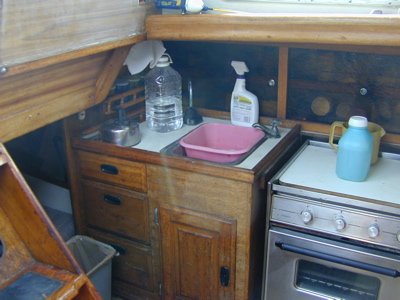
The galley was OK and the pressure water worked but the fittings were old and the water tank looked like it needed replacing. We took the stove home and cleaned it up. It was CNG and, for reasons that are a mystery to me, CNG has fallen out of favor as a stove fuel in boats now. It is far safer than Propane, although it does not have as high a specific heat. Propane requires a sealed box for the tank with electric controls as it is heavier than air and will collect in the bilge if a leak develops. Getting a new regulator, as the old one had a broken gauge, turned out to be difficult. Ironically, the only source for CNG equipment anymore is the company, Corp Brothers, that was owned by Avery Seaman, the former owner (before it was brought west) of the boat. His family still owns the company and his grand daughter promised to send some photos of the boat when it was in their family. They haven’t arrived yet.
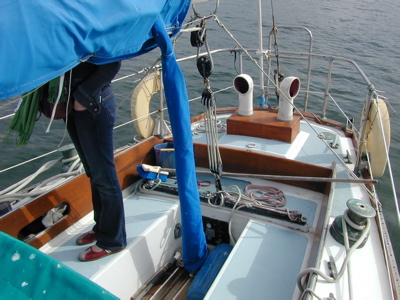
My daughter is standing in the aft cockpit. Behind her are large vents for the lazarette, which are mounted on a Dorade box. They looked like line snaggers. The main sheet rigging was in poor condition and I rerigged that completely. The traveller was replaced with a new Harkin model.
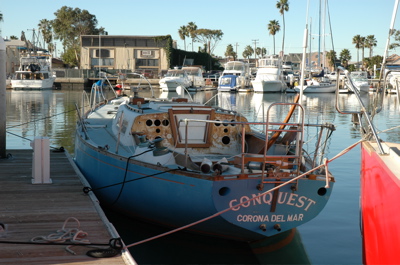
The cockpit bulkhead was full of old instruments that no longer worked. They had to go but the holes needed filling. We pulled the mast, intending to refinish it, and hauled the boat. Mike Jr and I worked for weeks stripping off all the gear. The old engine, a Pathfinder diesel, went to the Boy Scouts. The V-drive was not salvageable and was junked. The winches were chromed bronze and were frozen. I took them home and worked on them, eventually trading them to Minney’s chandlery for credit on Barient 28 stainless winches. The mast was corroded at the base and under a couple of winch pads so I junked it (It’s at Minney’s) and bought a new mast. We kept the old boom as it was not original.My biggest mistake was not replacing the toe rails but we didn’t know how badly the hull-deck seam leaked until a year later.Mike and I spent months stripping gear and filling holes in the deck. I took the lazarette hatch home, removed the Dorade box, and filled the holes with glass. The forward hatch remained but I eventually replaced it with a Lewmar hatch about a year later. We did not find any rot in the core although some of the commissioning was a bit sketchy. It had survived seven Bermuda races when it was owned by Avery Seaman. George Griffith had sailed four of those races aboard and he later told me that he always arrived a few days early to check out the boat. He brought fiberglass tape and resin with him and usually wound up retabbing some of the bulkheads. The Bermuda race, which crosses the Gulf Stream and is usually upwind, is hard on hulls. About 30 years ago, a production boat drove the mast step right through the hull in the severe seas of the Gulf Stream. Many fiberglass hulls are laid up in two halves and later bonded together. That mast compression load split the hulls. The Cal 40 has a steel beam under the step so the load is not on the hull there. I’ll describe the truss arrangement of the rig later. It was a big innovation that allowed Lapworth to design a light hull in the days when fiberglas was a new material.The mast was another matter. It was going to be more expensive to refinish it than to replace it since I was going to have all new rigging anyway.
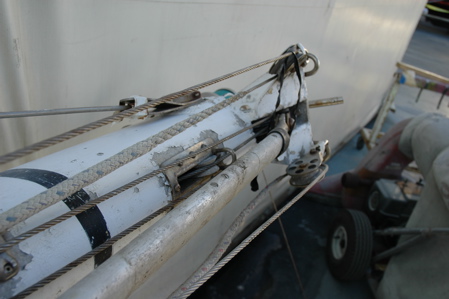
It shows old wire halyards and sheaves plus it had a reel winch that was almost impossible to get off. We saved the roller furling gear but the rest went to Minney’s.
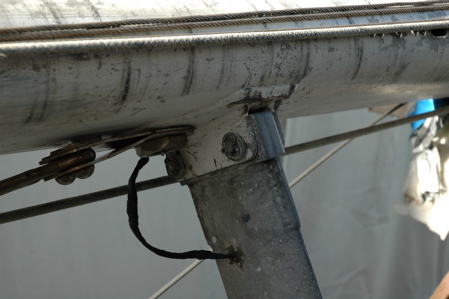
The spreader tangs were corroded and the tip fittings could not be opened to change the shrouds. They were junk.
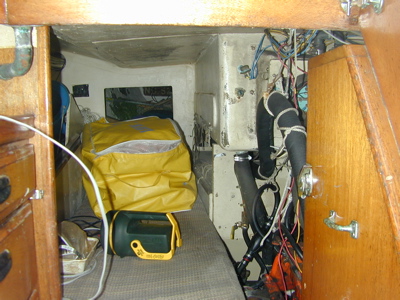
We took everything mechanical off the boat and, with a couple of exceptions, gave or threw it away. Here is the engine bed with the old engine and v-drive gone. The cushions are all gone. We wouldn’t have them in the boat while we were working anyway, but I took the old ones to a foam place that does good work in San Clemente and they used them for patterns for the new ones. Those wound up in storage for a year.
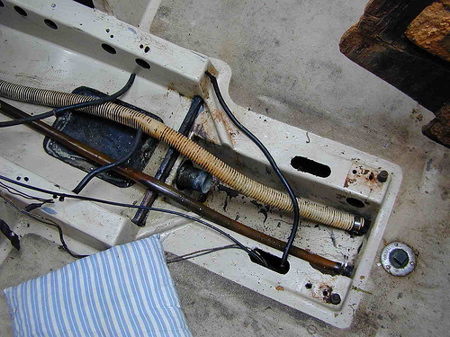
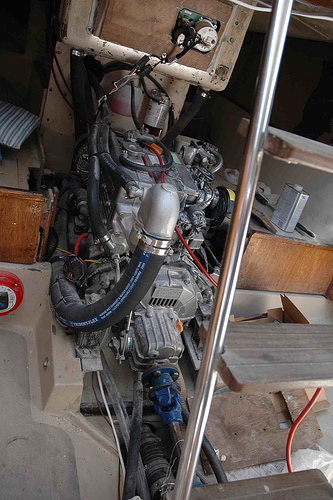
The engine bed shows both engine and v-drive gone. This exposes the inner end of the shaft log, the bronze tube that holds the shaft. The inner end has a packing gland or, as we chose, a “dripless gland” to seal off the sea. The metal plug to the right is a fill cap for a racing tank that had been installed in the bilge. It held about ten gallons but had been disconnected and a tank fill cap below decks is illegal anyway. We had to cut the tank up with a Sawzall to get it out. The engine mounts were too far apart for the new Yanmar 3YM diesel so the yard fabricated new ones from angle extrusions. The two hoses, one a white hose and the other oil stained clear plastic, are bilge pump hoses.We stripped out all the hoses and all the wiring, completely rewiring the boat. The water tank was original and the fittings were bad so I had a new one made. As it turned out, the metal shop we chose had built all the tanks for Cal boats back in the 60s when they were across the street in Costa Mesa.
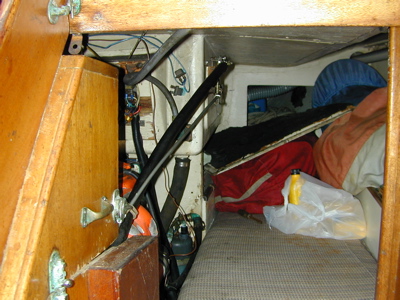
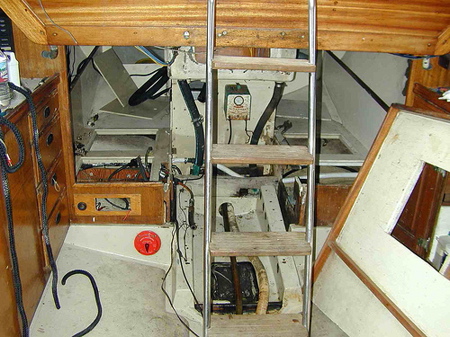
The new engine is installed and the new engine mounts can be seen below and to the left. Our steel ladder is also in the picture. The first photos of the engine bed showed an ancient corroded automatic battery charger. It is now gone and replaced by the coolant reservoir and a fuel filter. The back of the new engine control panel is above. The engine instruments are to port allowing room for additions in the future.
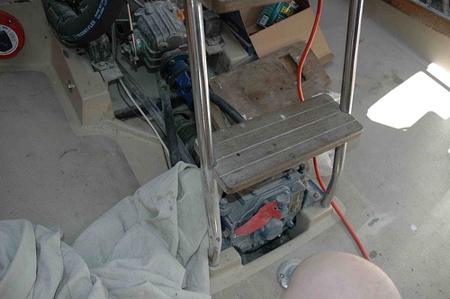
The new v-drive is seen beneath the bottom step of the ladder. The yard made a mistake in ordering the v-drive as the old engine had a one-to-one gear ration in the transmission. The Yanmar does not have a one-to-one option and the engine we installed had a 1.67 to 1 gear ratio. Unfortunately, the v-drive had been ordered with 1.67 ratio, as well. It had to be shipped back to Walter and rebuilt as 1 to 1 and returned. One concern was the tabbing of bulkheads to the hull.
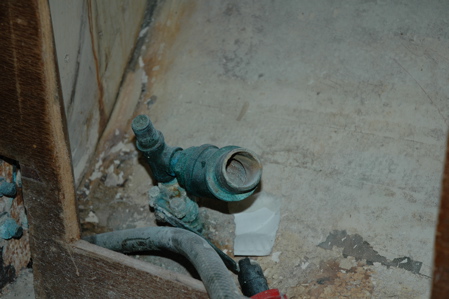
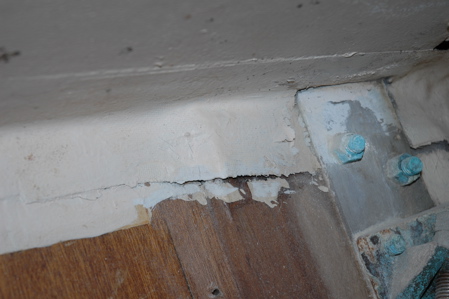
Here you can see the space beneath the head vanity cabinet. The thruhull for the sink drain and the head water intake is seen in the center. It was replaced before launching along with most of the others. The bulkhead, which carries the load from the port chainplate, attaches here to the hull. This bulkhead is also attached to the beam by several steel plates welded to the beam and bolted to the bulkhead. The plates can’t be seen here.
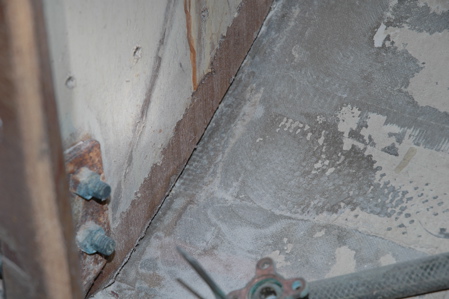
Here the debris from scraping the hull is gone and the area of the bulkhead tabbing can be seen clearly. The tabbing was loose and has been removed. One of the plates that attaches the bulkhead to the beam is shown at the left side of the photo. This tabbing was replaced before the thruhull was replaced and other work done that would have obstructed access to the area.
Here, tabbing from an aft bulkhead to the deck is seen and is disrupted. This is the area where the genoa track was (We removed it and filled the holes) and the load on the deck has pulled it up from this half bulkhead, which is just forward of the ice chest. This area was also ground down and retabbed.
Here, another area on the starboard side, is seen with disruption of the tabbing from bulkhead to deck. This is adjecent to the starboard chain plates. It was ground down and retabbed.
Once all the structural issues were dealt with, the boat was rewired. I copied Fin Beven’s suggestions shamelessly. He sent around a list of his own rewiring project and I used it as a reference, along with a couple of boat electrical guides. The best is Charlie Wing’s book. I ordered a new Blue Sea panel.
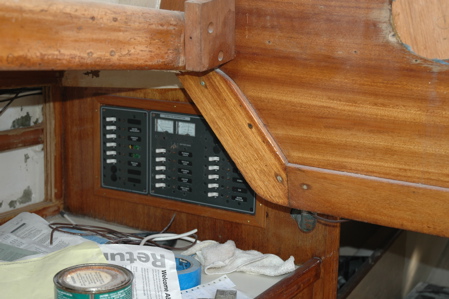
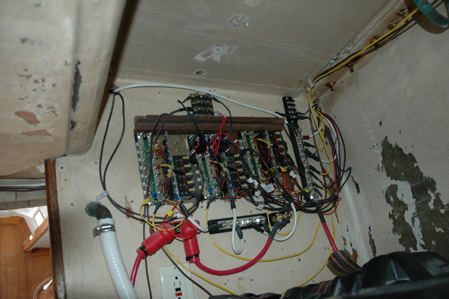
Here is the new panel in place. It is actually two panels mounted side by side. This should be sufficient for our needs for a while.
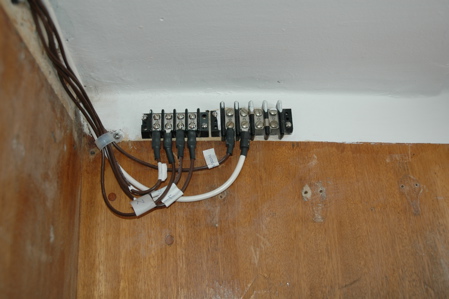
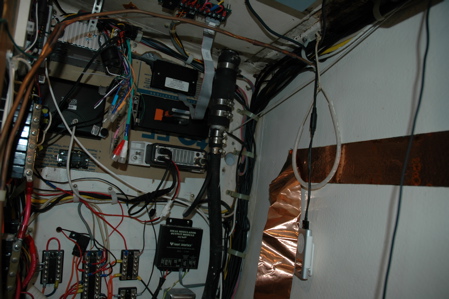
Here, the rear of the panel can be seen with wire harnesses. If you think this is complicated, the wiring of Fin Beven’s Radiant is seen below.
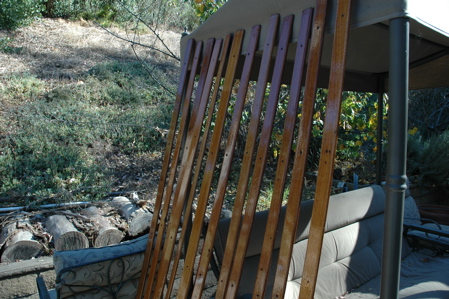
Fin’s panel is quite a bit more complicated plus his batteries are mounted in a different location allowing the use of more of the bulkhead for wire harnesses and buss bars.The entire hull had to be stripped on the inside and all the battens that lined the hull where bunks were located were removed. These were taken home, sanded and varnished. The hull was scraped and sanded and any glass repairs were completed. The battens were left off until the wiring job was nearly complete.
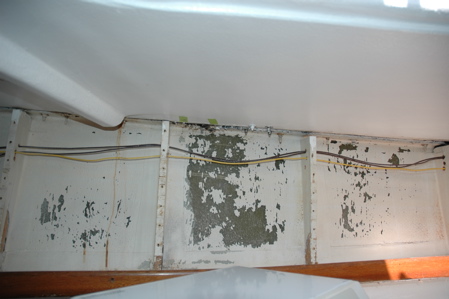
With the battens removed, the hull was exposed and could be scraped and sanded. After glass repairs were completed, the hull was painted with two coats of Kilz primer and two coats of Sears Kitchen and Bathroom paint. This paint is supposed to resist mildew.
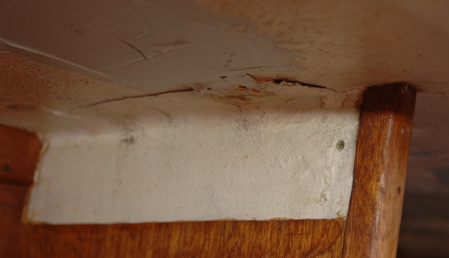
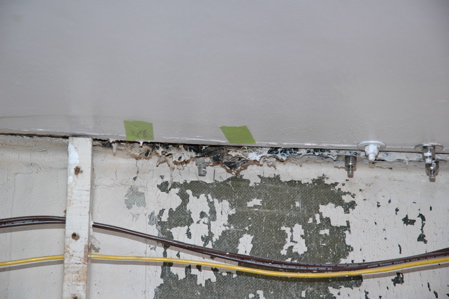
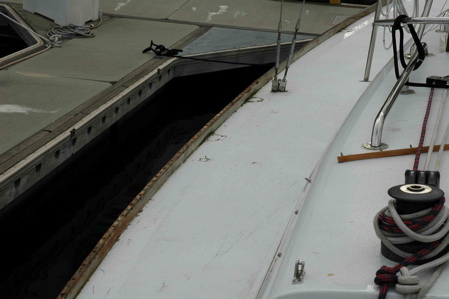
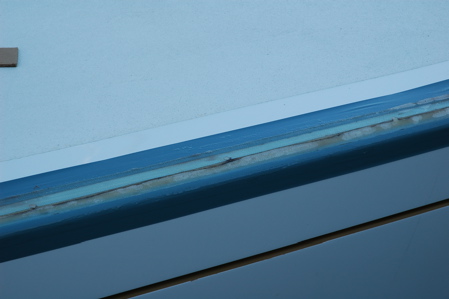
The starboard bow also proved to have the worst leak site in the hull-deck seam. A closeup is seen here and running a hose on deck would produce a flood below. This was not fully appreciated until the hull had been painted. I was also not eager to learn what the yard would charge to replace the toe rails. Both toe rails were cracked at a point opposite the forward end of the deckhouse. My theory is that this was a result of the Bermuda Races with flexing of the deck and hull where the reenforcement of the deck stiffness, which is increased by the cabin sides, ends. The leak site is marked with green tape. I tried squirting caulk in there but only the toe rail job would fix it.That came a year later.
The battens all went home where they were sanded and varnished with four or five coats. Then they waited for the other jobs to be done. Eventually, the interior got sanded and painted. The glass repairs were done. The battens were replaced once the wiring was almost done.
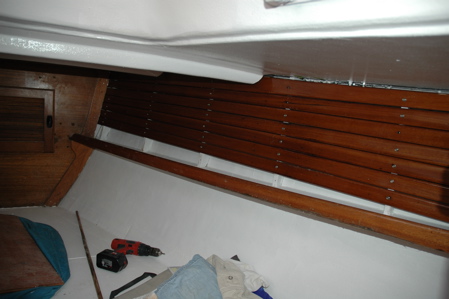
Here, the v-berth area was painted and the battens are being replaced. The leak was still not fixed but that would come. The hull was painted by the yard all in one weekend. We had been delayed by a rainy winter, but it was June and the weather improved.
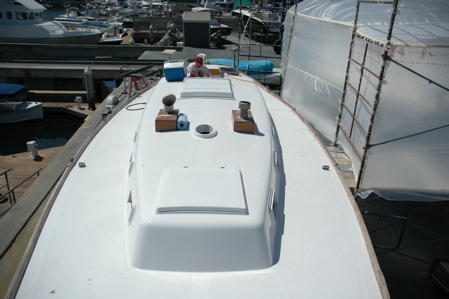
Here the deck is painted and the masking removed. The hatches were painted separately and replaced on the boat.
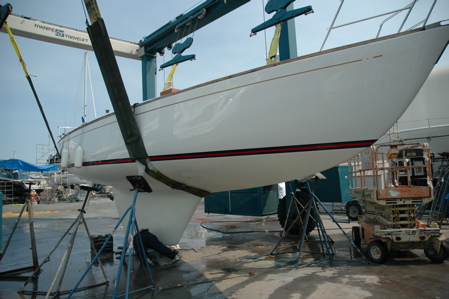
The hull is now white and the boot top a series of blue-red-blue stripes that I have had on my boats for 40 years. For bottom paint, I chose Pettit Vivid White, which Practical Sailor says is the only white bottom paint they have tested that doesn’t yellow.
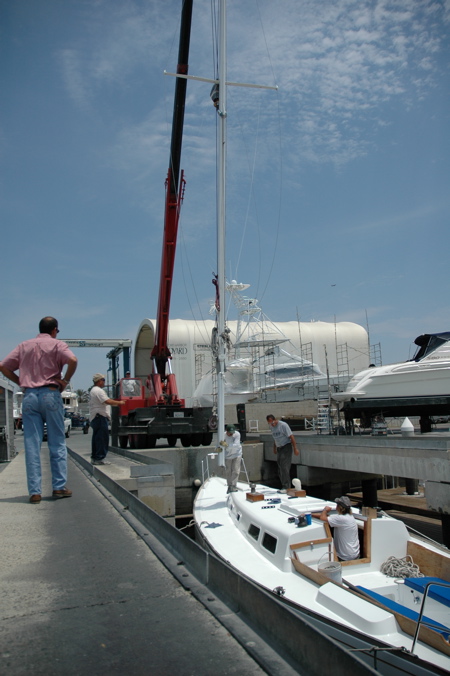
Once the boat was launched, we stepped the new mast and it was ready to commission. I had new bow and stern pulpits made by a company in Costa Mesa. The stanchions were made by Railmakers and the lifelines by another company whose name I don’t have at the moment.
We pulled out of the travel lift slip with the mast still being rigged and set up. Later that day, we took the boat up Long Beach where I had sublet Wendy Siegel’s slip while she was off in Transpac. Once the boat was safely tucked away in Long Beach, we flew to Hawaii for the finish of Transpac 2005.
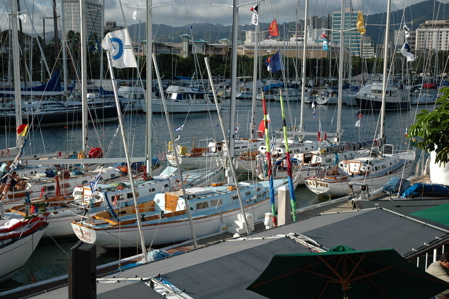
In Honolulu, we spent a lot of time at Hawaii Yacht Club, which does a wonderful job with the race in spite of almost no help from the state, which owns the marina at Ala Wai. The marina is in terrible shape but while there we got to see a sight that has not been possible since 1969. There, rafted in front of Hawaii Yacht Club are 13 Cal 40s. There were 14 entered but Tim Lessley had alternator problems that forced him to withdraw soon after the start.
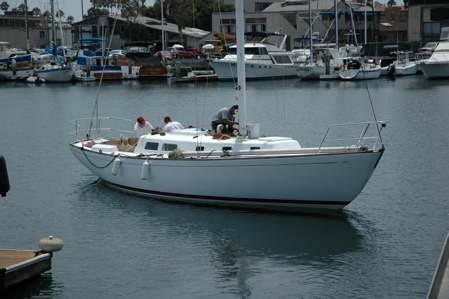
Here the boat sits in Wendy Siegel’s slip with lifelines and stanchions added. We sublet until she was almost back, then moved the boat to Wilmington. By the year end, it was home in Cabrillo Marina adjacent to LA Yacht Club where she lives today.
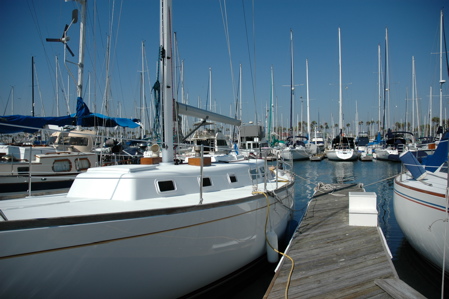
Here the boat sits in the Cabrillo Marina. A sail cover has been added and work was ongoing on the interior. It would still not be ready to sail until the spring of 2006.
The toe rail project.
The toe rail was cracked at the forward end of the cabin on each side and there was a serious leak in the hull-deck seam that required repair. Wendy Siegel had done a repair befopre the 2005 Transpac but her toe rail was in better shape than ours.They had raised the starboard toe rail to access the seam and Duncan had repaired the seam by sealing it with fiberglass and then the toe rail was replaced and resealed.
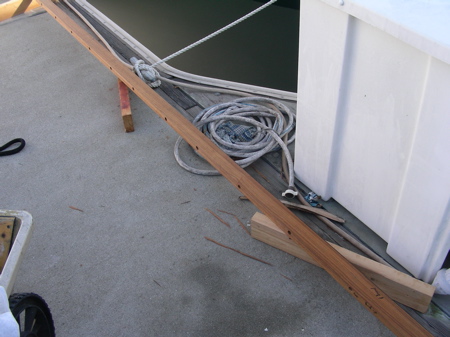
The old rails were in poor condition so they were removed and discarded. Here the tracks had been removed and bolts taken out. The rails were lifted and the holes all sealed along with the seam.
The stanchions and pulpits had been removed. The seam area was cleaned up and the seam and bolt holes were sealed with epoxy putty.
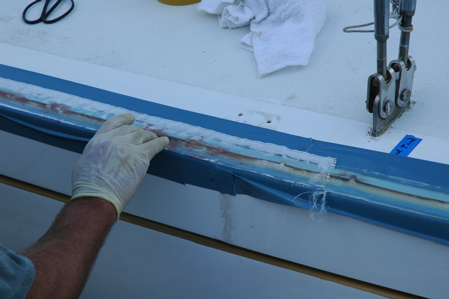
The seam was then covered with glass tape after masking the hull and deck on either side.
The tape held down the epoxy putty and reinforced the deck beneath the new teak rails.
The finished seam with tape applied and masking about to be removed is seen here. The next step is to dry fit the toe rails. All the holes have been sealed so new bolt holes with be drilled.
The new teak rails were assembled by the ship’s carpenter and milled to accomodate the seam, which is raised on the deck side. Beneath, the seam is overlapped for strength. We did not add any reenforcement below decks.
The joint is now sealed and ready for the new teak rails. The masking tape is removed and the rails are dry fitted. This is just another view of the photo above.
The rails are attached at the bow and bent to fit the curve of the hull.
First they are dry fitted and holes drilled for the new bolts.
The rail is bedded with caulk and the bolts are tightened down.
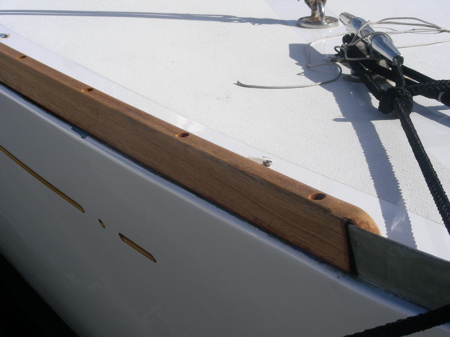
Once the new rails are complete, the stanchions and pulpits are replaced. The leaks are sealed and the polished tracks, cut to about half the original length, are replaced. The bolts are covered with teak plugs.The came the varnishing. The carpenter sealed the rails with epoxy sealer and we added about 8 coats of varnish over the next two months. Some touch-up painting of the hull was required where the glass tape showed at the edges of the teak toe rail.
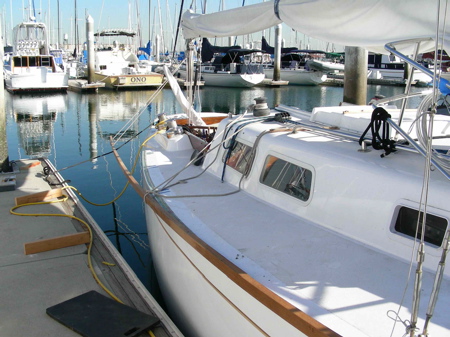
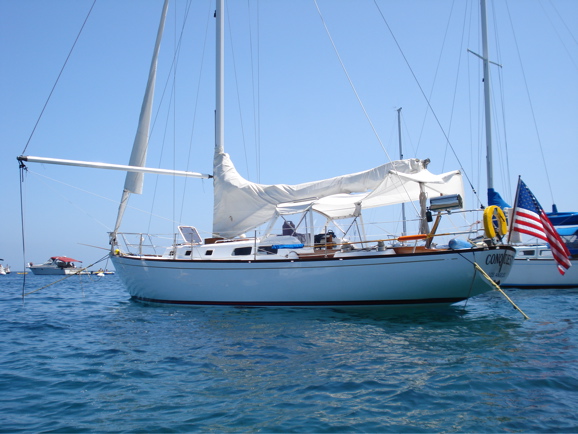
By the summer of 2007, she was ready for Catalina. The sunshade is rigged and the spinnaker pole rigged as a flopper stopper. The interior was virtually finished although the holding tank still needed a bit of work.
How does it look a year later ?
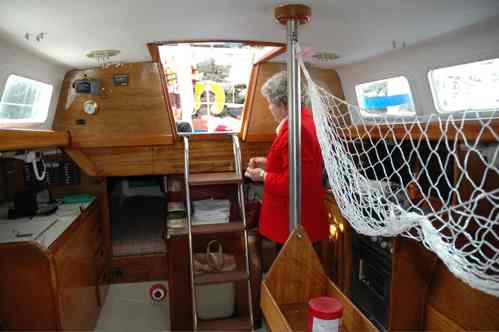
The cabin is complete. Here is the engine box and ladder. The panels covering the bulkhead are in place.
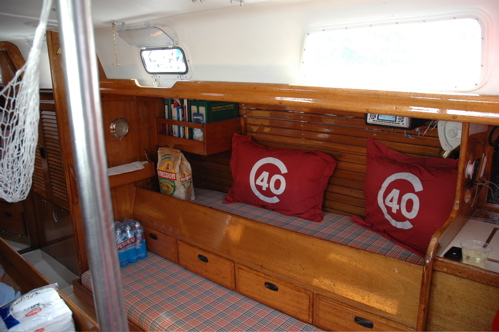
The starboard pilot berth shows the new cushions and the refinished wood.
This photo show the new engine box and ladder. The top of the engine box is Formica and adds storage but can be removed and the entire box lifted off to allow access to the engine. The top step of the ladder is wider to keep grandchildren from falling through.
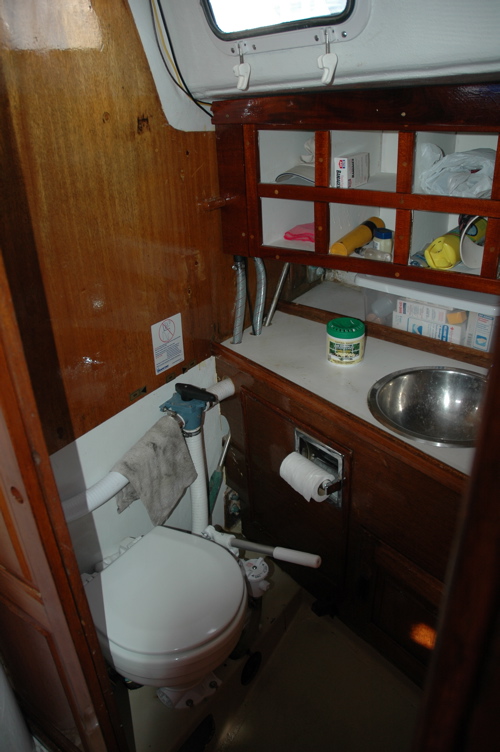
The head shows the storage cubbyholes and the new toilet. The valve to the right of the toilet is to direct outflow to the holding tank or into the sea. There is a loop in the water intake line for the head that is visible on the left side of the vanity counter top and beneath the stowage cabinet. That was placed there because the previous toilet had a tendency to fill with sea water when the sea cock was open. The new toilet does not do that and the loop has since been removed. The sea cock was left open at anchor because it is the drain for the sink. We had no trouble with backflow from the joker valve but the intake valve was not preventing the toilet from filling and could have sunk the boat.
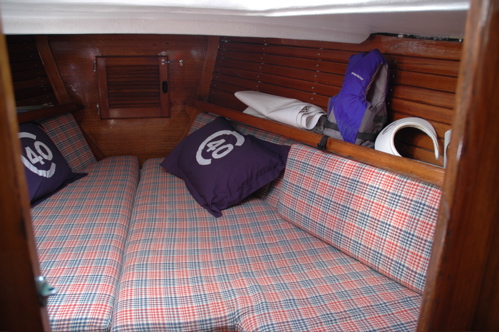
The V berth shows the new cushions plus bolsters beneath the shelves on each side. A wood piece fills in the opening to make the vee-berth a triangle. Ahead of the berth is the anchor chain locker that is large enough to crawl into but is left empty. The boat had a small windlass and a chain stowage hawse pipe when I bought it. Those holes in the deck were filled.
The equipment list is below.
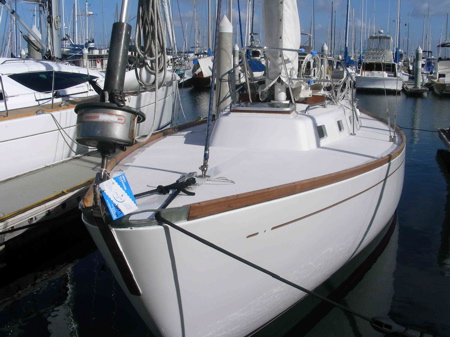
This is hull # 96, built in 1967, and completely restored to new condition. It has sailed in seven Bermuda races and came close to winning one year under a previous owner. George Griffith sailed in four of those races aboard.
Complete restoration was done from 2004 to summer, 2005. The hull was refinished, all hardware removed, and it was painted in Sterling LP white by Newport Harbor Shipyard. Bottom paint is Vivid White, last painted September 2009.
Current survey is available. Spring 2009
Hull and Deck-
Teak toe rails replaced 2007 with hull-deck seam refinished and sealed. No leaks.
Sail tracks on toe rails refinished 2007 and shortened. Stainless steel.
New pulpits, stanchions and lifelines 2005.
New Lewmar fordeck hatch 2007.
Cabin windows replaced 2005- fixed ports custom from Mark Plastics; opening ports with screens from Beckson Marine.
Cleats and pad eyes all with G10 backing plates.
All teak refinished 2009.
New stainless grab rails on cabin top 2007
Cockpit cushions new 2006 and thick for sleeping in cockpit at anchor. Blue Naugahyde-like material. Matching tapered back rests for cockpit.
New stainless wind scoops for Dorade boxes on deck.
Compasses mounted on teak platforms at each forward corner of cockpit. Compasses rebuilt 2005. LED night lights.
Sailing Gear-
New mast and rigging 2005. Standing rigging stainless rod. Carbon fiber backstay. Mast and spinnaker pole, Seatek, using Ballinger tapered spar.
Forward lower shrouds removed in restoration and chain plates removed. Deck openings for chain plates sealed 2005. The mast has a tang for a baby stay if desired.
Three jib halyard system in mast plus main halyard. Topping lift/staysail halyard with winch on mast.
Windfly at masthead. VHF antenna at masthead.
Boom 1983 with two reefs and flattener.
Mainsail cover white sunbrella fabric 2005
All new running rigging with high tech sheets and guys.
Winches- Four Barient #28 cockpit, two Barient 24 for halyards. All halyards lead to cabin top with stoppers. One Harkin #10 on mast for topping lift.
Harkin mainsheet track and car-new 2005. Six part mainsail sheet to car.
Fairleads and snatch blocks stowed in heavy gear bag when not in use.
All halyards lead to aft cabin top through fairleads on cabin top. Jammers at cabin top winches to allow two winches to control four halyards and two reef lines.
Double foreguy leads to cam cleats on cabin sides.
Reaching strut.
Sails-
Cruising main 1983- former racing main and in good shape. North Sails.
Racing Main- Ullman new 2007
Light #1- New 2007- Ullman Sails
Heavy #1- recut for roller furling gear. Good condition. North Sails
Working jib- fair condition.
# 4- spitfire jib- Good Condition
Storm Trysail- good condition
Spinnakers- 1.5 oz symmetrical- North Sails 2003
3/ 4 oz symmetrical – North Sails 2003
½ oz symmetrical – North Sails 2003
Cruising Spinnaker, asymmetrical – Good condition.
Mechanical-
New Yanmar 3YM diesel engine. 2005. 1.67 to 1 transmission
New Walter V-drive- 1 to 1 ratio 2005
New prop shaft, cutlass bearing, dripless gland and Martec prop 2005
All exhaust and filters new.
Morse engine controls with removable throttle and shifter handles.
New thru-hull fittings and sea cocks.
New stainless water tank 2005- 60 gallons with electronic gauge in galley
New stainless holding tank- bottom of hanging locker with macerator pump through sea cock. Deck connection for pumpout station. Gauge and pump switch near electrical panel.
New toilet and sink in head.
Boat entirely rewired with Blue Sea panels and 110V shore power with Blue Sea breaker panel. Three Phase battery charger and three new deep cycle batteries 2008.
Raymarine 4000 ST autopilot.
Laminated tiller with tiller cover.
Boat entirely replumbed with new stainless water tank in bilge. Pressure water in galley. Foot pumps in head and galley.
Rule automatic bilge pump with manual bilge pump accessed from cockpit.
Cabin-
All new cushions 2005. Hull stripped and painted inside 2005. Hull battens- teak, refinished 2005. All surfaces refinished and varnished.
CNG stove with oven. New CNG regulator and hoses 2006.
.
Pressure water in galley. Foot pump water in galley and head.
New light fixtures. In all bunks, head, and over dining table.
Original drop leaf cabin table with original gimbaled tray above. Can be removed for racing and stainless pole to support cabin top is used when table is out.
Pilot berths port and stbd. Thick foam cushions for comfort. Pullout settee berths port and stbd. Lee clothes for pilot berths.
Vee berths with new cushions. Side cushions same pattern as base cushions.
New light fixtures in all bunks.
Custom engine box of mahogany plywood with Formica top for storage. Lifts off engine for access.
Stainless accommodation ladder with teak treads. Boat name carved in top tread.
Cabin sole painted 2007.
Head- New toilet and holding tank.
New cubby hole cabinet above vanity.
New sink with foot pump for water.
Electronics-
Signet knotmeter and depthsounder with water temp gauge.
GPS with antenna on stern pulpit.
Masthead trisect LED running lights
Bow running lights, stern running light on pulpits
Anchor light at masthead
Steaming light/deck light on mast.
Sears dehumidifier in cabin during winter.
Shore power cord
Water tank gauge in galley
Holding tank gauge and pump switch
VHF radio
AM/FM/CD Stereo with cockpit and cabin speakers.
Cruising Gear-
Westmarine inflatable dinghy with wood transom
Sunbrella dinghy cover
4 hp outboard- four cycle. Mounts on stern pulpit when not in use.
Lifting davit for outboard on stern.
Propane barbeque on stern pulpit
Sunbrella Covers for outboard and barbeque.
Folding stainless boarding ladder with teak treads.
Stainless flopper stopper with bridle.
Attaches to spinnaker pole at anchor.
Cruising custom dodger with sunbrella fabric and windows with covers.
Cockpit sunbrella sunshade with side curtain, removable.
Cockpit table, removable with support socket in cockpit sole.
Safety Gear-
MOM overboard harness and line’
Horseshoe life ring with polypropylene line, and gear.
MOB poles
Coastal life raft- new 2007
Flares and flare gun
Life jackets- 12
Cockpit cushions – type 4 personal floatation.
Hand held VHF
Chart book and navigation gear.
Ground tackle- four Danforth anchors of various sizes with chain.
Two 300 foot reels of nylon anchor line with thimbles, stowed in plastic tubs.